5.2. Data Transfer#
There are many possible methods for transferring data between local environments (such as your laptop) and the Kempner cluster. We focus on three methods in detail below: scp, rsync, and globus.
Your choice of method will primarily depend on the size and complexity of the data transfer. Of the three methods we cover below, scp is the simplest and most straight-forward tool. It may be the best choice for transferring a few small files. rsync has improved efficiency and additional functionality, including the advantage of preserving progress if a transfer is interrupted. Globus should be used for large-scale data transfers.
5.2.1. scp#
Scp, which stands for secure copy, is a straight-forward method for copying a few small files. scp is a command line tool, which you can use by first specifying the ‘from’ location and then the ‘to’ destination.
scp [file path to location of file] [file path to destination of file]
If the file is on the cluster, you will need to put your user name and server information before that file path (see Example 1).
You can copy an entire directory of files by using the -r flag (which stands for recursive):
scp -r [file path to location of directory] [file path to destination of file]
Example 1: Copying a file from laptop to Kempner cluster
Jane Smith wants to transfer a file called data.npy from her laptop’s Downloads folder to her home directory on the cluster. She can accomplish this with running the following command on her laptop.
scp /Users/janesmith/Downloads/data.npy janesmith@login.rc.fas.harvard.edu:/n/home02/janesmith/projectdata/
Example 2: Copying a directory of files from Kempner cluster to laptop
Jane Smith wants to transfer an entire directory, called results, from scratch storage on the cluster to her laptop’s Documents folder. She can accomplish this with running the following command on her laptop.
scp -r janesmith@login.rc.fas.harvard.edu:/n/holyscratch01/janesmith_lab/Users/janesmith/results /Users/janesmith/Documents/
Tip
You can use the shortcut ‘~’ to stand in for the path to the home directory.
In the examples above, /Users/janesmith/ is the home directory so Jane could have used ~/Downloads/data.npy instead of /Users/janesmith/Downloads/data.npy.
5.2.2. rsync#
Rsync is a versatile, customizable file-copying tool. When you use rsync to transfer files, it only sends differences between the source and destination files, rather than all of the files. This efficient delta-transfer algorithm reduces the amount of data sent over the network and ensures you do not have to start over if the file transfer is disrupted. It also means that rsync is particularly useful in keeping directories synced between two places, including between a local environment and the cluster.
The command syntax is similar to scp:
rsync [arguments] [file path to location of file] [file path to destination of file]
You can customize the rsync command by adding any of the arguments below directly after the rsync command:
Rsync Argument |
Description |
|---|---|
|
Compresses the data as it is being sent. This uses CPUs on both ends (to compress/decompress) but is usually faster. |
|
Archive mode. This ensures rsync preserves information such as time stamps and permissions, and copies directories recursively (meaning that the content of directories inside of the original source directory is also copied). None of these are default rsync behaviors. |
|
Verbose mode. Gives more information during transfer. |
|
Shows a progress meter for each file being transferred. |
|
Performs a dry run, i.e. displays information but does not actually copy files. Use with -v to check that the command will transfer the intended files before actually doing it. |
|
Excludes files from transfer that match the PATTERN. |
Warning
Unlike most similar commands, a trailing / on a directory name is meaningful for rsync. It changes the behavior from transferring the whole directory to transferring the contents of the directory. See example 2.
Check out the rsync documentation for further information and additional argument options.
Example 1: Copying a file from laptop to Kempner cluster
Jane Smith wants to transfer a file called data.npy from her laptop’s Downloads folder to her home directory on the cluster. She can accomplish this with running the following command on her laptop. She will use the archive mode argument (-a) and the verbose mode argument (-v):
rsync -av /Users/janesmith/Downloads/data.npy janesmith@login.rc.fas.harvard.edu:/n/home02/janesmith/projectdata/
Example 2: Copying a directory of files from Kempner cluster to laptop
Jane Smith wants to transfer an entire directory, called results, from scratch storage on the cluster to her laptop’s Documents folder. She can accomplish this with running the following command on her laptop. She will use the archive mode argument (-a) and the verbose mode argument (-v):
rsync -av janesmith@login.rc.fas.harvard.edu:/n/holyscratch01/janesmith_lab/Users/janesmith/results /Users/janesmith/Documents/
This creates a directory called results in the Documents folder, with all the files inside that were in the results directory on the cluster.
Let’s say that Jane includes a trailing ‘/’ on the first file path:
rsync -av janesmith@login.rc.fas.harvard.edu:/n/holyscratch01/janesmith_lab/Users/janesmith/results/ /Users/janesmith/Documents/
This behaves differently. Now, the files that were in the results directory on the cluster have been transferred directly to the Documents directory. There is not a ‘results’ directory on the local machine.
5.2.3. fpsync#
While rsync is appropriate for most synchronization needs, fpsync may be more suitable for synchronizing large directories. fpsync synchronizes directories in parallel by using fpart and rsync to launch several jobs simultaneously, and, like rsync, the synchronization can be resumed if disrupted. fpsync can launch synchronization processes locally or remotely on one or more workers using ssh. Remote workers must be able to access both the source and destination directories. Unlike rsync, only the source directory contents are synchronized, not the directory itself.
fpsync [arguments] [absolute path to source directory] [absolute path to destination directory]
When passing in the path to the source and destination directories, the absolute path must be specified.
You can customize the fpsync command by adding any of the arguments below directly after the fpsync command:
fpsync Argument |
Description |
|---|---|
|
Set the number of concurrent synchronization processes. Default: 2. |
|
Limit the number of files assigned to each sync job. Default: 2000. |
|
Limit the size (in bytes) assigned to each sync job. Default: 4GB |
|
Path to temporary directory where fpsync logs are stored. Default: /tmp/fpsync (you need to change this) |
|
Arguments for rsync (if you do not want to use default options). See above for rsync arguments. Do not use –delete. Default: -av –numeric-ids |
|
Arguments for fpart. Default: -x .zfs -x .snapshot* -x .ckpt |
In most cases on the FAS RC cluster, your fpsync command might look like:
fpsync -n [NUMBER OF CONCURRENT JOBS] -t /temp/directory /source/directory /destination/directory
As noted above, fpsync logs are found in /tmp by default. When running on the FAS RC cluster, you must specify a temp directory that you can access.
You can also submit a job to run fpsync and set the number of concurrent jobs to the number of cpus requested:
srun -c $SLURM_CPUS_PER_TASK fpsync -n $SLURM_CPUS_PER_TASK -t /temp/directory /source/directory /destination/directory
Refer to the fpsync documentation for further information and additional argument options.
5.2.4. Globus#
Globus is a file sharing service designed for the secure and efficient transfer of large datasets. Unlike the methods above, you can transfer data through a user-friendly web interface. While we cover transfer between the cluster and a local machine below, Globus can also be useful for sharing data with external collaborators even if they do not have access to the FAS RC cluster.
5.2.4.1. Set-up#
Set up general globus account
Click on “Log in” on the Globus website
Select Harvard University as your organization and log in using Harvard Key.
Set up Kempner cluster as an endpoint
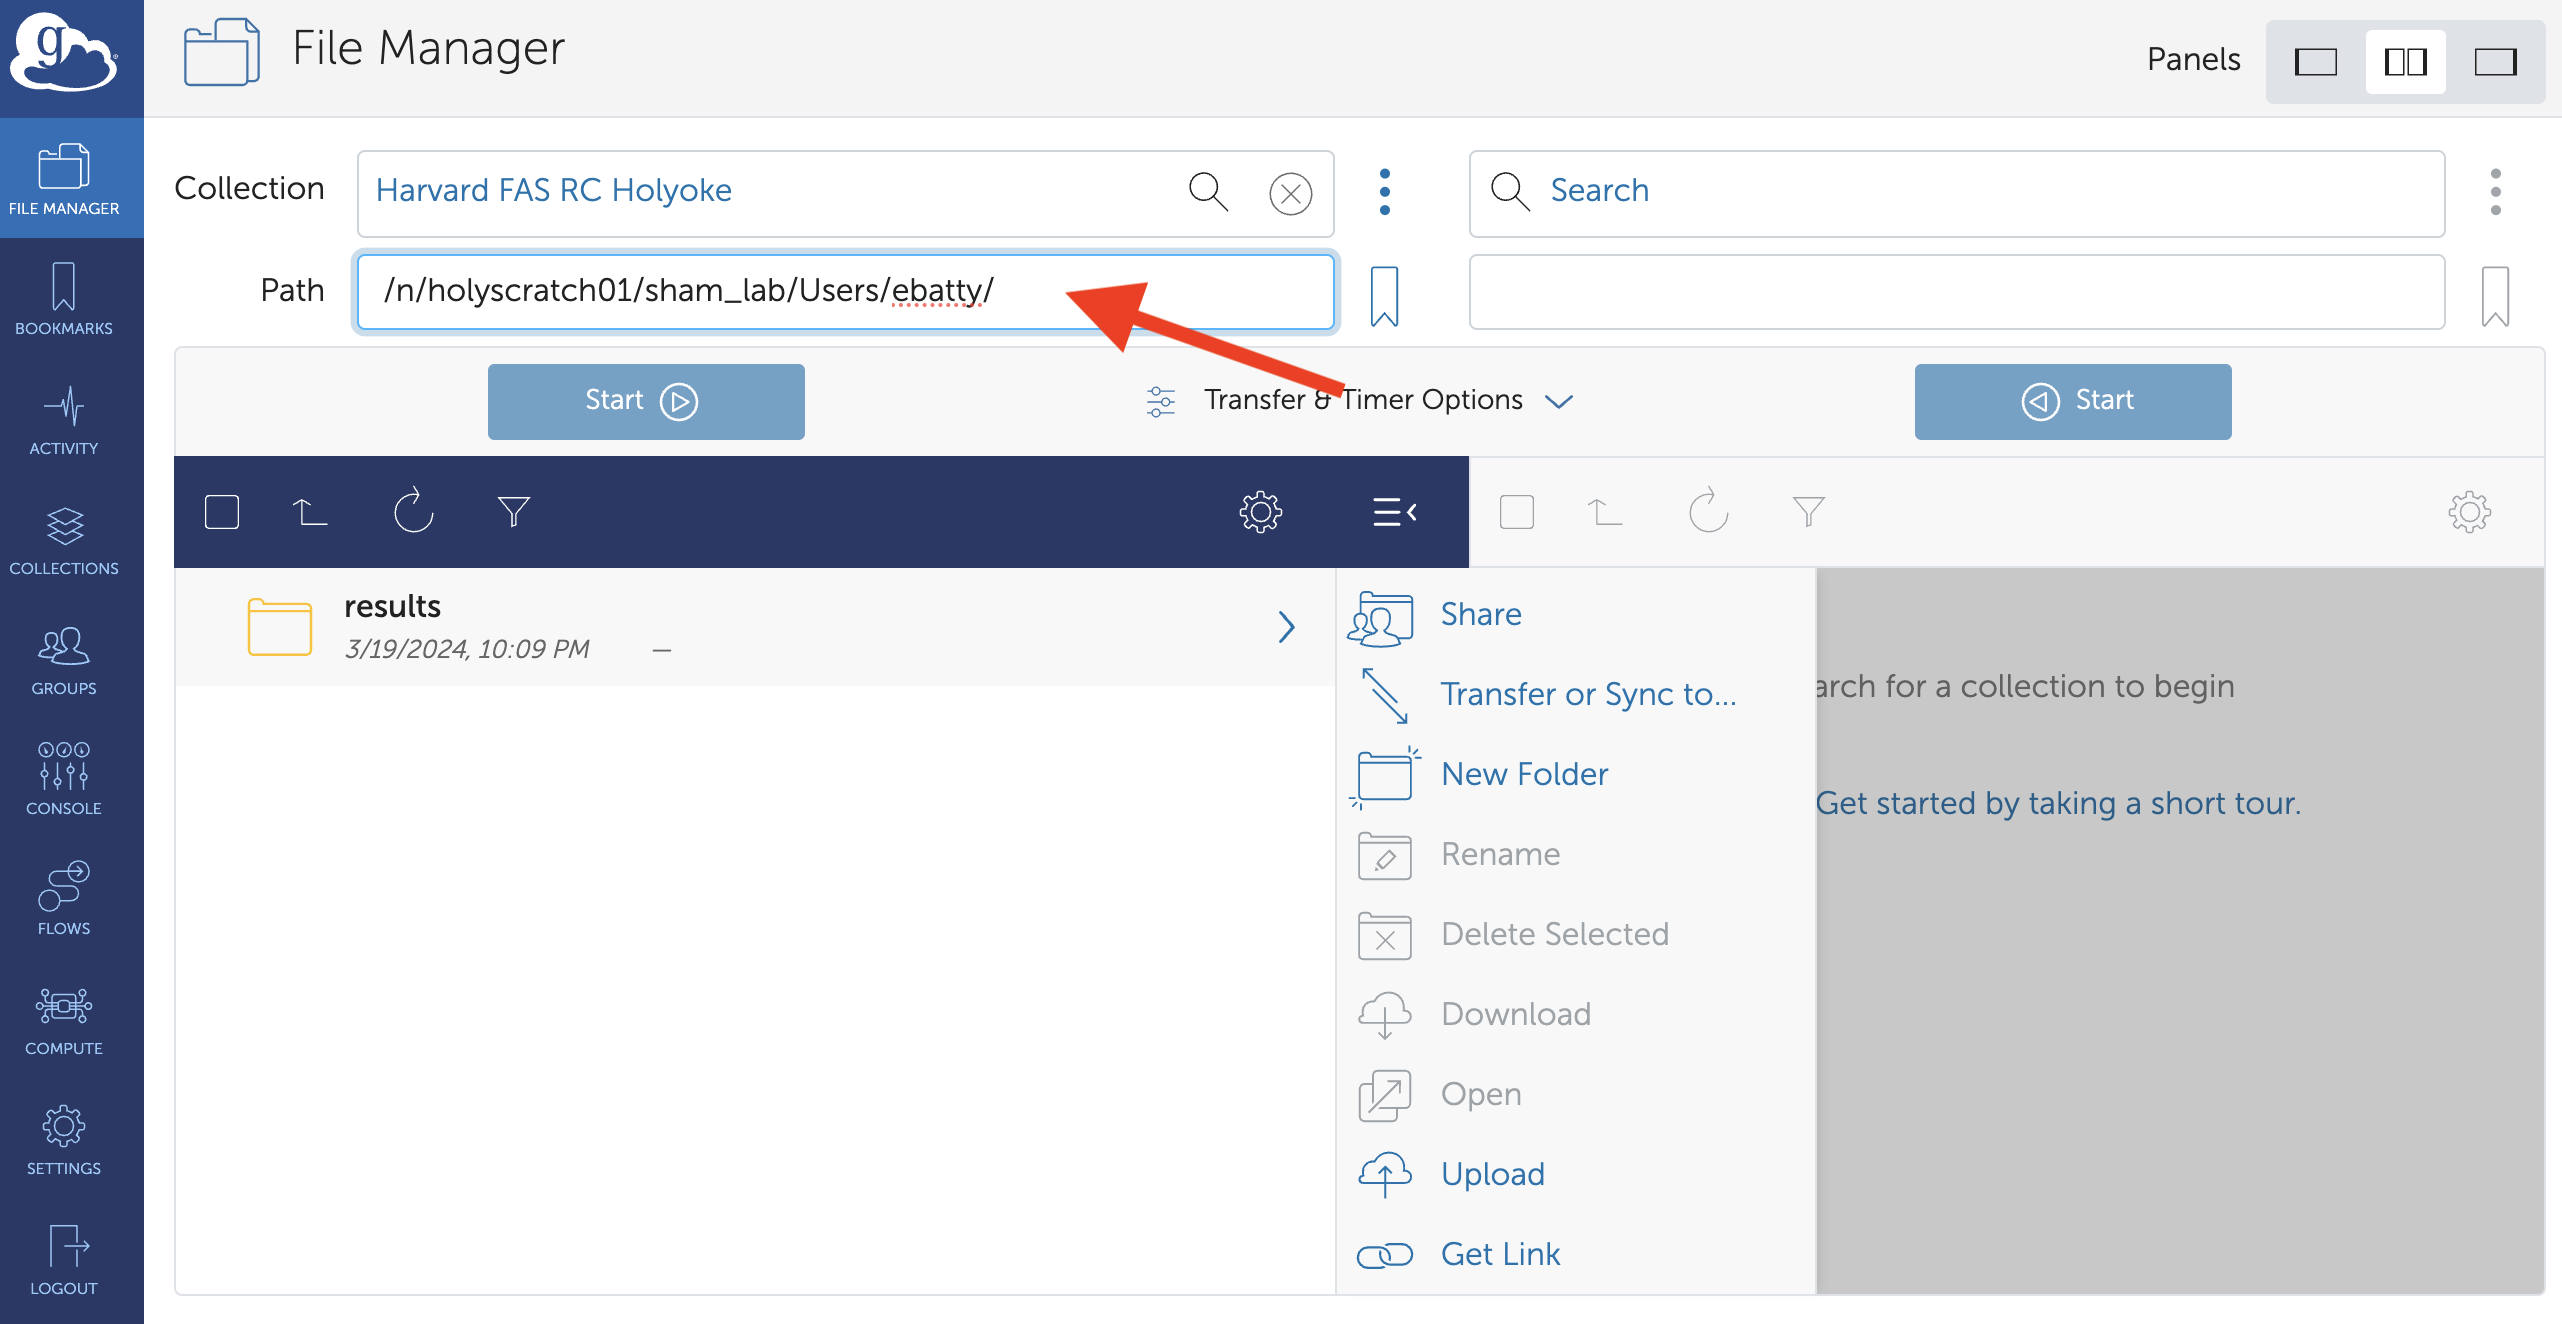
After logging in, you should be on the File Manager page. In the “Collection” field, search for “Harvard FAS RC Holyoke”.
Select “Harvard FAS RC Holyoke” in the search results. It will ask you to authenticate your FASRC account, using your username and verfication code (code from your 2-factor authentication, not your password)
You should now be able to see files and folders on the Kempner cluster. You will have the same permissions as if you were accessing the cluster via traditional log in. You can type a path into the “Path” field to go directly to a particular directory.
Set up your local machine as an endpoint
Download and install Globus Connect Personal for your operating machine
Open Globus Connect Personal (on a mac, find it in the Applications folder). Log in, consent to the terms, and enter the details for your Globus Connect Personal Collection.
If you run into any problems, Globus has tutorials on installation for each platform here.
If you navigate back to the Globus File Manager, you should now be able to search for your personal collection in the Collection field.
5.2.4.2. Data Transfer Example#
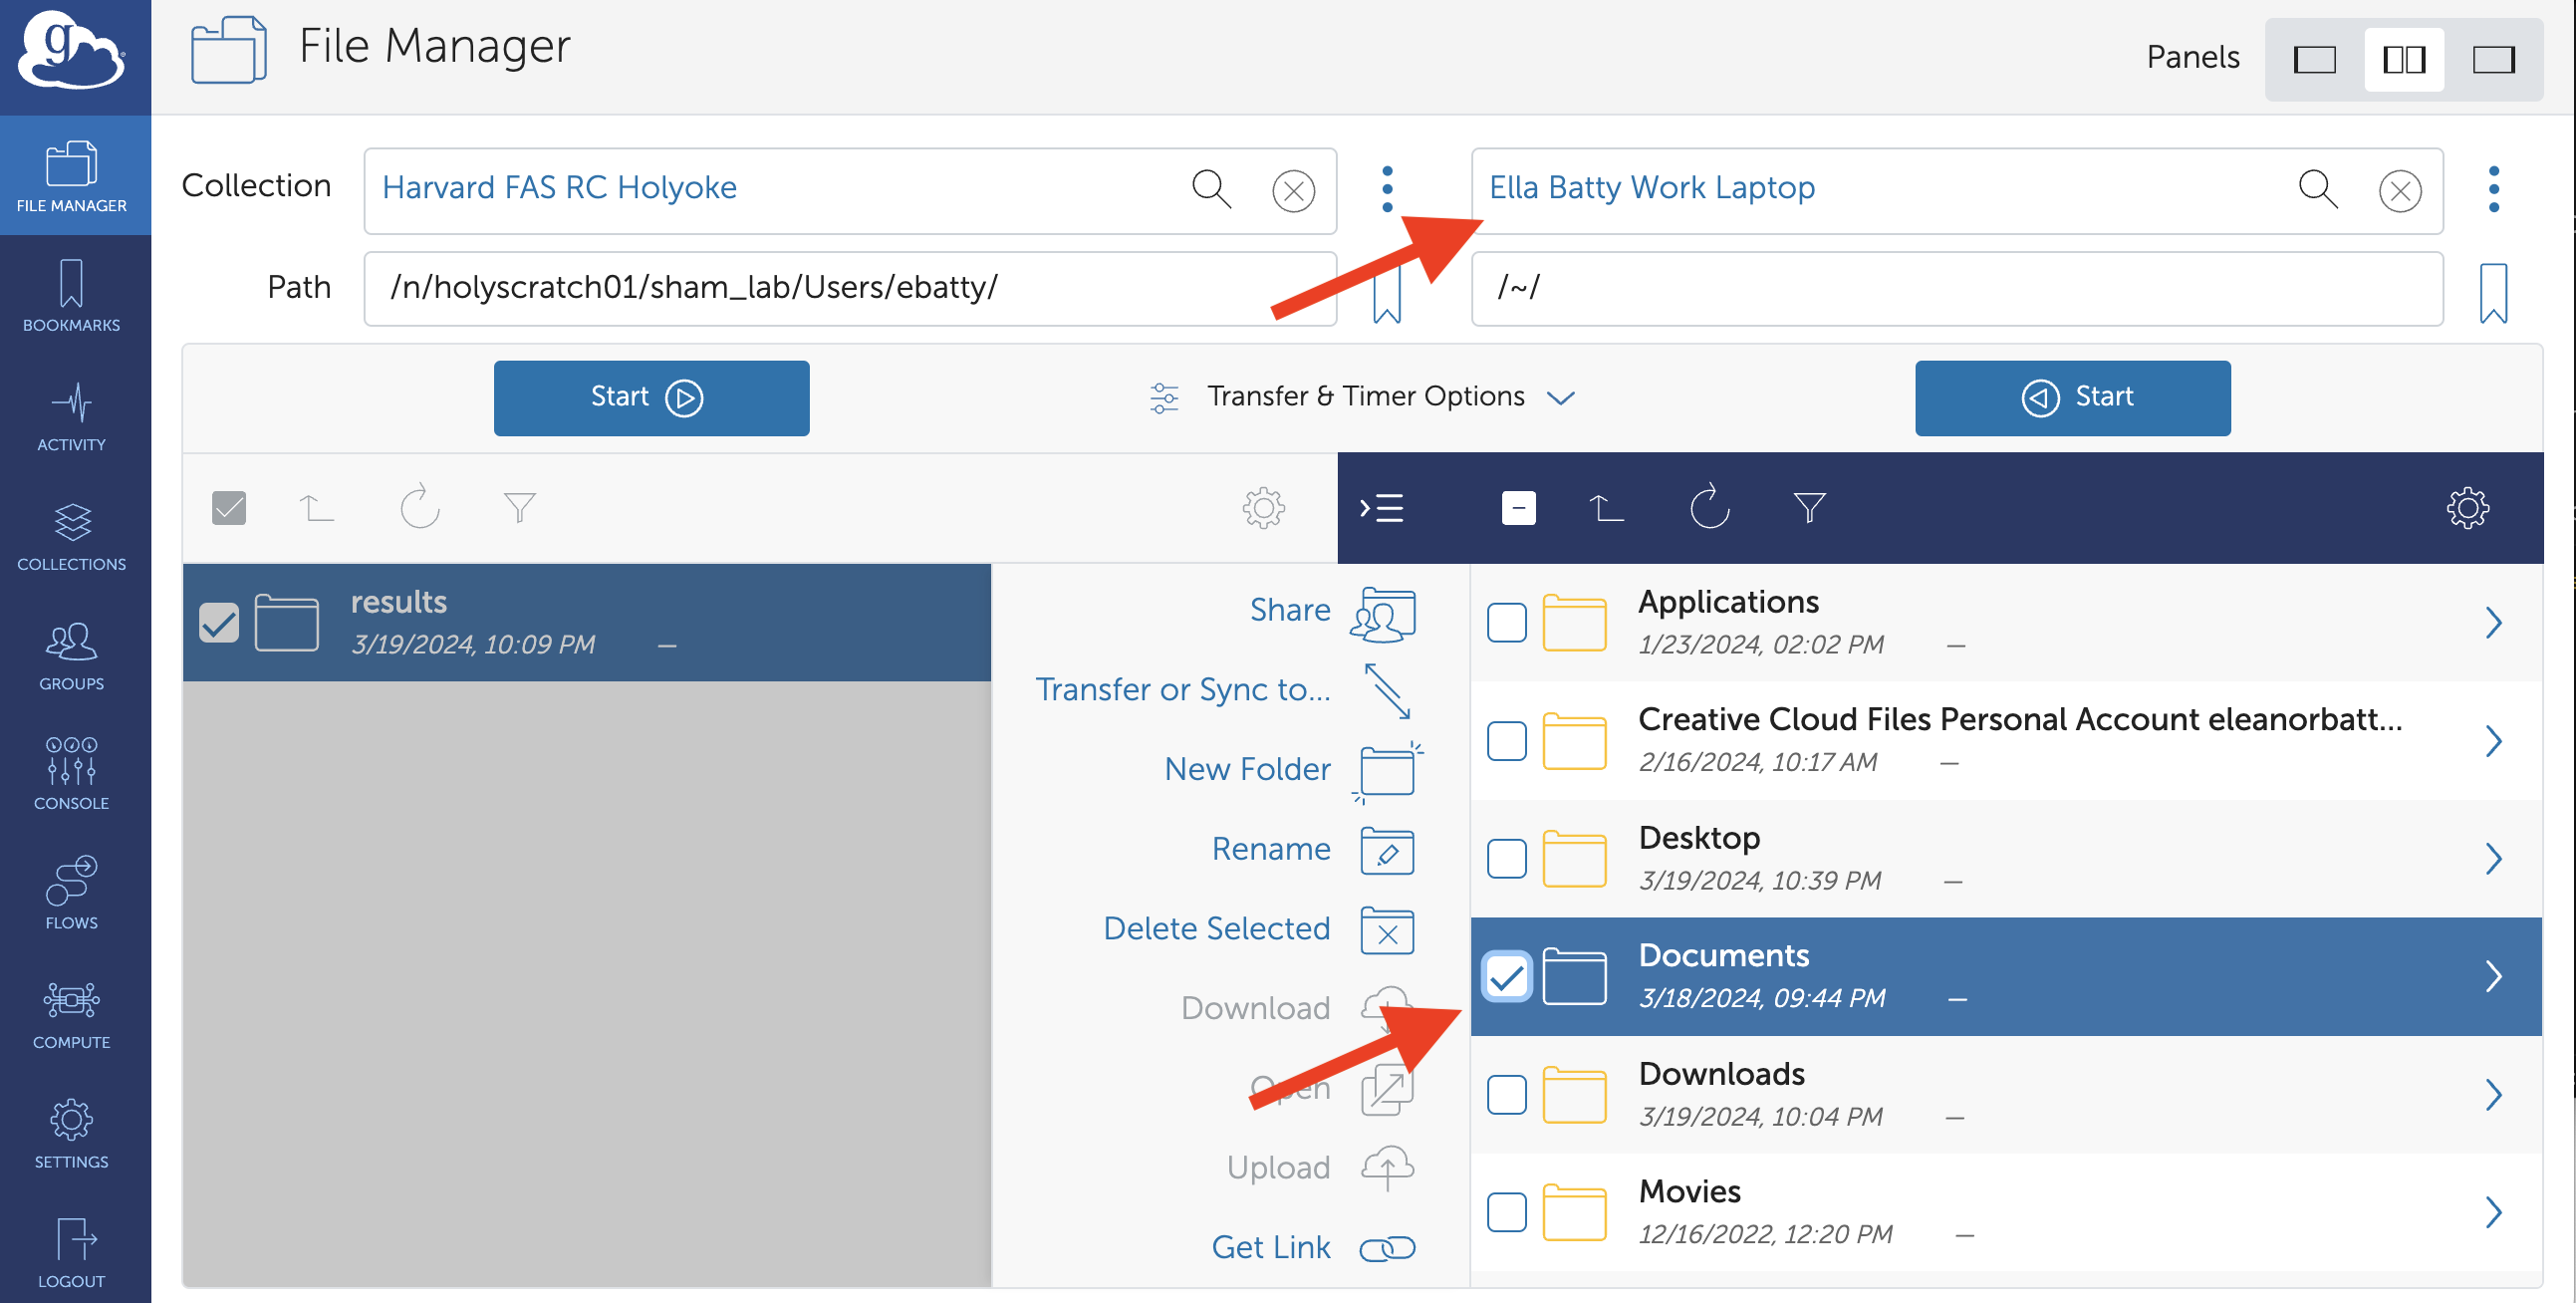
In this example, we will transfer an entire directory called results on the cluster to the Documents folder on Ella Batty’s local machine.
First, set up the collection you are transferring data from and navigate to the correct directory. In this case, the collection is Harvard FAS RC Holyoke and the path to the results directory is
/n/holyscratch01/sham_lab/Users/ebatty.
Select the directories or files you would like to transfer and click “Transfer or Sync to…”

On the right hand side, connect to the collection where you would like to transfer data to. In this case, it is “Ella Batty Work Laptop” (a Globus Connect Personal collection). Navigate to and click the destination directory for your transfer.
Click the “Start” button below the collection containing the source data. You should see a green notification pop up when the transfer request is successfully completed. You can also navigate to the Activity tab on the left-hand panel to see details about the transfer.
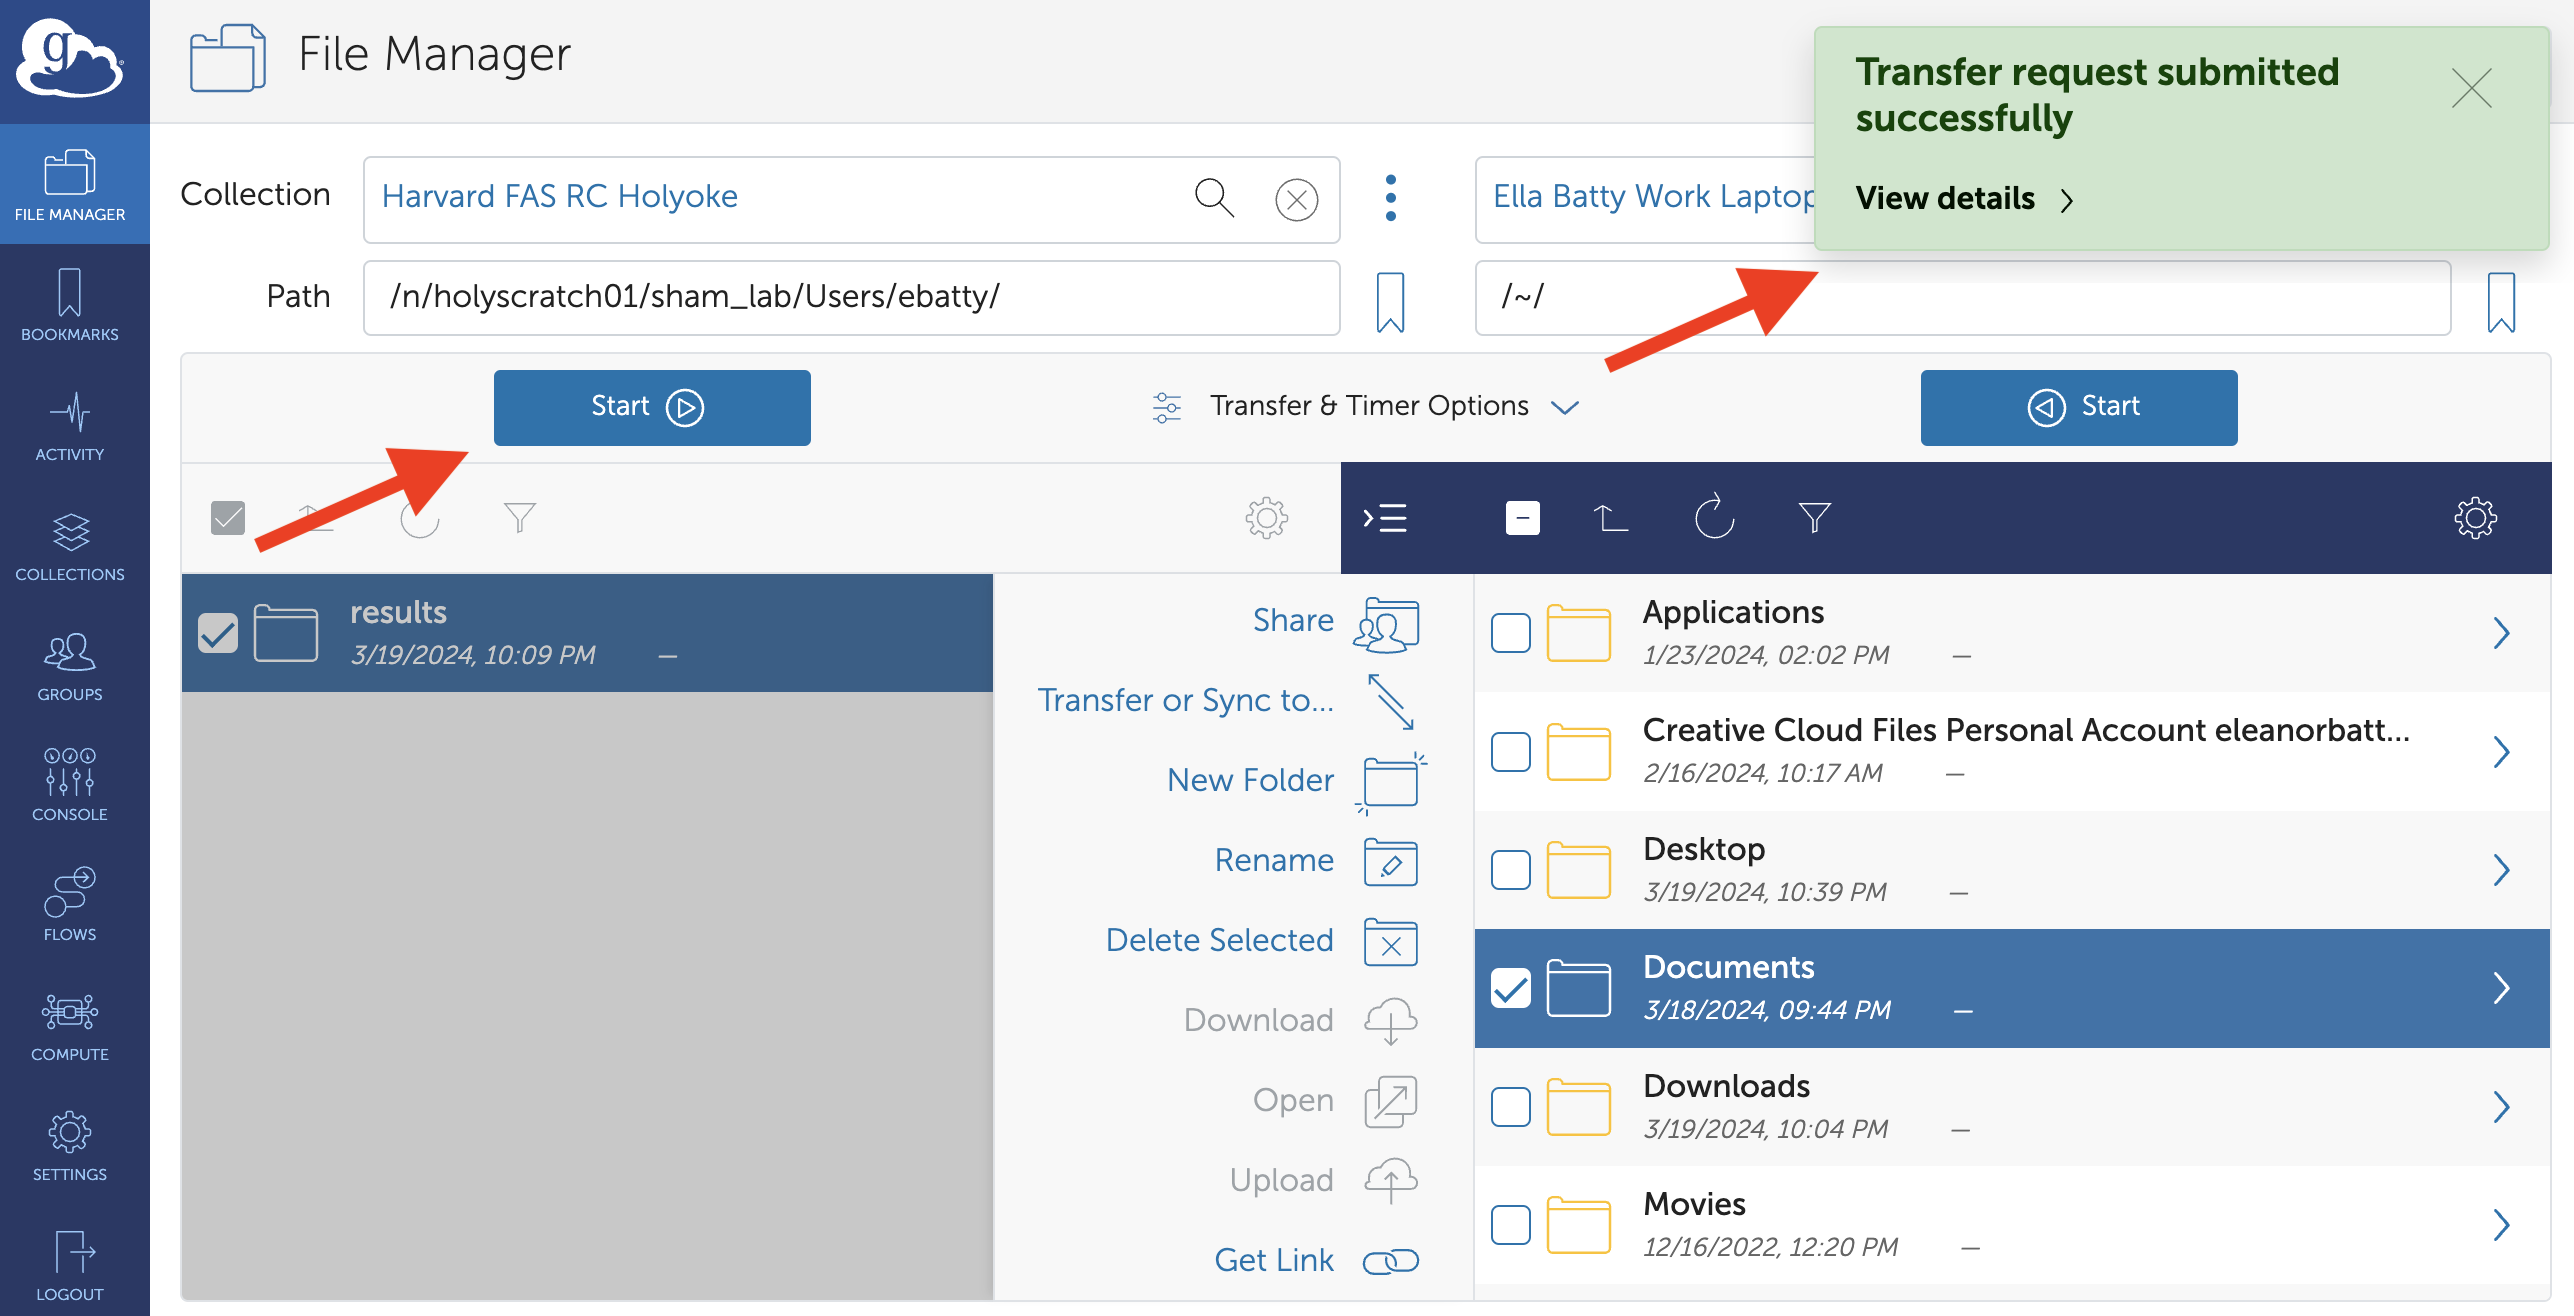
Warning
Note that which “Start” button you press matters. In this scenario, pressing the “Start” button on the right hand side would have resulted in the entire Documents directory from the laptop being transferred to the cluster!